Last week I did a post on What To Do Computer Boots Up Slow, and one of the fixes I mentioned is running a Scandisk and Defrag. As promised, I will be discussing more about it here today for Tech Tuesday.
Scandisk and Defrag are important Windows' utilities that help you tune up your Windows file system and make sure it's running properly. Scandisk checks the drive to make sure there aren't any problems with it, and Defrag (short for Disk Defragmenter) organizes the file blocks to help Windows read files faster. In time as the files keep on moving (edit, delete and/or create) the computer files will get chopped up and saved into different location thereby creating gaps or fragments of the files saved in different locations on the disk. Defrag will solve this by moving the fragment file blocks into a single contiguous block which makes it much faster to read files and load it into memory.
You can easily find Scandisk and Defrag by opening "My Computer", right click on the drive you want to tune up, the choose "Properties". The popup box will kind of look like this --
Once you click on "Properties", it will give another box, and choose the tab for "Tools". It should look like below --
Another way would be by going through the START menu, then go to "Programs", then "Accessories" and then "System Tools".
Please note that Windows should be able to tell you when was the last you run a Scandisk and Defrag on your computer. If you see a message like "Windows was unable to determine when you last checked this drive for errors", or "Windows was unable to determine when you last defragmented this drive", then you probably haven't done it since Windows was installed.
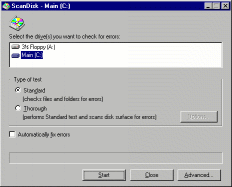
This is the older version of the disk defragmenter. (Windows 98 version). As early as Windows 95, the disk defragment tool has been around. You will find a box at the top that lets you select which drive you would like to check for errors.If you to Scandisk multiple drives, just can hold down the Ctrl key while selecting them. Usually you will just select the one drive you are interested in.
Then as you go along you will find two radio buttons, called Standard and Thorough. A standard test completes fairly quickly, but only checks the FAT tables and directory entries. The Thorough test can take a long time, but performs a test on each sector of a drive. This test is similar to the one performed when formatting the drive.
Almost all of the time, I would recommend using the Standard option. Any errors that are not due to a failure of the hardware can be detected with a Standard scandisk. On the other hand, if you suspect the hardware is having problems, or sectors on the drive are going bad, choose the Thorough option.
The checkbox near the bottom named "Automatically fix errors" controls the behavior of Scandisk when a problem is found. If you leave this box unchecked, Scandisk will stop and ask you what course of action to take, for each error it finds. Scandisk's default actions are pretty safe, so it's okay to leave this checked.
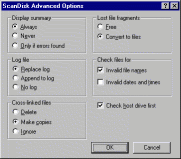 The left image shows the dialogue box presented after clicking the Advanced button. The default settings are shown here, and there is little reason to change them.
Most of the settings are self-explanatory. "Check host drive first" applies only to compressed drives. A compressed drive must be contained within an uncompressed drive, and checking this option tells Scandisk the uncompressed drive first.I will discuss about "Lost file fragments" and "Cross-linked files" next week!
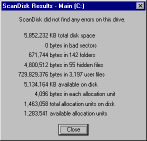 To the right shows the Scandisk results window. "KB total disk space" is the usable size of your disk, left over after the FAT filesystem overhead. "KB available on disk" is the total free space left. "Bytes in each allocation unit" is the cluster size of this filesystem. "Allocation units on disk" and "available allocation units" are the same as "KB total disk space" and "KB available on disk", respectively, except expressed in units of clusters instead of kilobytes. To convert from clusters to kilobytes, you can multiply by the "bytes in each allocation unit" field, then divide by 1024.
"Bytes in bad sectors" shows the number of bytes used up by clusters that have been marked bad (unusable). A small number of bytes in bad sectors (less than 100000) is normal, as is finding a new one now and then. On the other hand, if your drive regularly finds new bad sectors, it is probably time to think about replacing the drive.
The other fields are self-explanatory, and just show the number of bytes taken up by different types of files on your system.
 After starting Defrag, you will see a window similar to the left, asking which drive you would like to defragment. Unlike Scandisk, there is no way to select multiple drives simultaneously. In Windows 98, the defragmentation process will start as soon as you hit the `OK' button, so the `Settings' button is also on this window.
 To the right is the main Defrag window. Under Windows 95, you will usually just click the `Start' button. Under Windows 98, Defrag will automatically start working, so there is no need. The `Advanced' button here takes you to Defrag's settings.
After Defrag has started working, it will display a percentage bar showing how much of the drive has been defragmented already. At this time you can click the `Show Details' button if you wish to watch Defrag moving the blocks of data around your drive. It isn't a very useful option, but it can be fun to watch, especially if you're bored waiting for your Defrag to finish. If you have a slower computer, using this option may slow Defrag down noticably, but anything faster than a Pentium 166 with a decent video card won't experience a significant slowdown.
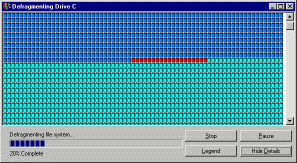 On the left you can see a screenshot of Defrag in action, when Show Details mode is on. Hitting the Legend button will show a chart detailing what the different coloured blocks mean. The Pause button will halt Defrag temporarily, and Stop will cancel your defragmentation.
 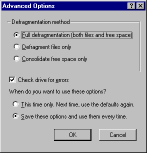 Here is a screenshot of the Defrag settings under Windows 95. The default options are shown here. There are 3 choices for the Defragmentation Method. The first is `Full', which is the best choice. It moves files so that they occupy continuous ranges of clusters, and Windows can read them faster. It also tries to make the space not used up by files into one large block. The second choice is `Files only'. With this option you will get the benefits of defragmenting the filesystem, but since the free space may still be scattered around the disk, new information written to the disk will more easily become fragmented again. The third option, `Free space only', doesn't optimise any of your current files, but will help make sure new ones do not fragment.
You should leave the "Check drive for errors" option checked. It doesn't take much time to do a quick check of your drive before the Defrag, and you risk losing data if you try to defragment a corrupted filesystem.
The Windows 98 Defrag has fewer settings. Again there is an option to check the drive for errors, and one to tell Windows to rearrange your files so that they load quicker. I don't know of any downside to that option, and it does improve performance, so leave it checked.
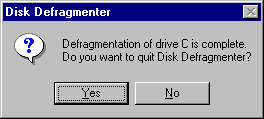 When Defrag is done, it will present you with this window. Just hit `Yes' unless you want to defragment another drive.
The newer version of the disk defragment tool is even much better and easier to operate. Here is how the Windows XP version looks. With fewer buttons and a visual view of you file block you can already determine how fragment the file block are. This one needs a defragmenting for sure. :-) By simply clicking on the defragment button, the system will run the tool and your system will be optimized.
So that's it! Very simple, very easy!
I will teach you next week on how to create handy shortcuts for Scandisk and Defrag.
Happy Tuesday!




1 comment:
I have a headache now!
Post a Comment